Some Tools and Tips |
---|
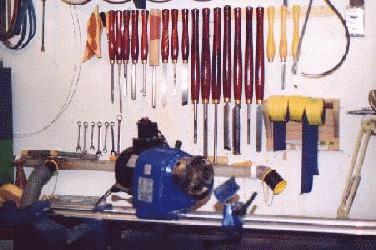
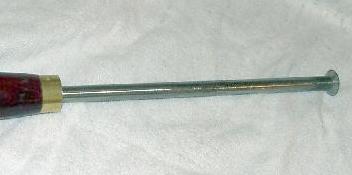
Some of you have asked to see "the monster", the lathe kept out in the garage for several years just to balance large pieces to the point where I could put them on my Record lathe (Also since departed). The front cover is off so you can see the size of the motor. It runs on 110 volts, and weighs about 200 pounds by itself. I think it dates from the 1940's somewhere.
|
---|
![]() |
This was how I had my Record CL348 x 30C lathe set up in the shop. The lathe was big enough for most work that anyone would want to do, but I finally got a lathe with the capacity to turn the very large pieces I always wanted to turn. In December of 2000 I bought a General 26020VD lathe, likely the last lathe I'll ever need. The only thing I miss in my basement shop is some exterior light. I'd love to work in a bright room with natural light. Ah well, maybe some day.
|
![]() |
---|
This is a shot of the steady rest I made for the lathe to provide support for long pieces, as well as support for some of the hollow forms when I first begin to hollow them out. This will now be changed to fit the new General lathe. I also made another, larger one of steel you can find just below.
|
![]() |
---|
OK, here's the one I made for the General lathe, shown set up with a 23" tall roughed out vase in its grip. This one is made with 3/4" threaded rod welded into the base. The skate wheels were rescued from the garbage can at the Sport Chek store a few blocks from our house, and I got them for nothing. They were out of round, but a few seconds spinning at 45 degrees to the belt on my 1" sander got them perfectly round. |
![]() |
---|
This is the shaft and handle I made of maple to hold a "Termite" tip for deep hollowing. The original tool is fairly short with a ½" shaft. This baby is over 4 feet long and is made of 1" chromed steel rod that is tapered, drilled and tapped to hold the ring cutter. It will reach way into the deep vessels and cuts like a fiend. |
|
---|---|
![]() |
I checked into the cost of a fibre optic light for illuminating the inside of hollow vessels during turning, and for turning super thin walls. For thin walls, the light is placed inside the spinning vessel during the hollowing, the shop lights are extinguished, and the wall thickness is determined by the amount of light that shines through. The fibre optic light emits no heat, no electric current is present, it's lightweight and can easily be taped to a chisel shank or held by hand. What I found was a hefty price tag. So, I made my own.
|
![]() |
---|
Thanks to the Internet and a friendly woodturner on the newsgroup, I met C.A (Cajun) Savoy. I called him to ask if he would make me a couple of hollowing tools, and he was kind enough to send me a couple to try out. Now that's trust for you, since he's from Virginia and I live thousands of miles away in Winnipeg. On the right is the 5/8" tool for deep hollowing and on the left is the ½" tool with a sharper hook in it for getting in close to the neck of the vessel. I wanted C.A. to see the tools with the handles I made for them. Thanks, C.A. They are fantastic! |
|
---|---|
![]() |
![]() |
|
|
---|---|
![]() |
![]() |
![]() |
![]() |
![]() |
![]() |
![]() |
![]() |
I added this to this page several years later. I said previously that I left my toolrest on the belt sander at a constant 35 degrees. I use home made wedges like the one shown on the top right photo to sharpen tools that require a different angle, like my scrapers. The wedge shown takes the tool rest to 65 degrees for the scrapers, and another one takes the angle to 90 degrees for parting tools, etc. |
---|
In 2001, I started making a few tools of my own to work on the large pieces I am now able to turn on my General lathe. I've got a couple of walnut blanks for 26" deep vases, and to reach to the bottom of those I needed some sizeable tools. After making a 56" long holder for my ring cutters, I decided I still needed a couple of very large scraper-type tools to smooth the ridges left from the ring tool on the inside surfaces, so I made the two shown below. The one on the top is 40" long and the bottom one is 54" long. |
|
---|---|
![]() |
You've heard of people using old files as scrapers. Well, this is a safe way to do that. Files are very brittle carbon steel and can snap quite easily if used full length and extended over the tool rest. I would never recommend you do that. However, these cutters are made from an old file. I simply scored the file, snapped off the cutters and ground two cutting sides onto them (there's no reason why you couldn't grind three or four of different contours). If one side gets dull, or you want a slightly different contour on the cutter, just loosen the bolt and turn the cutter around 180 degrees. It also allows you to swivel the cutter to get just the right cutting edge to the wood. |
|
---|---|
![]() |
![]() |
|
This is a very interesting and very useful tool. It is made by Record tools, and consists of a single sharp disc mounted directly on the end of a shaft. It cuts at about the 10 o'clock section of the circle, and is drawn from the center of the work towards the outside of the piece with the bevel rubbing. It is used to level the bottom of bowls, and I have found nothing that does it better. It's a wicked tool to learn to use, but once you've mastered it, nothing will do a better job. No sandpaper is needed most of the time, especially across end grain. This is a "skew" for the bottoms of bowls.
|
|||||
|
|
Here's a series of little tips and things that I find very helpful to have around the shop. When I thought of doing this, I looked around the place and thought, "What are the things I reach for most often". Here are some of them, and I'll add to this as time goes on. |
|
|
|
|
|
All woodturners sand - there's no getting around it. You can spend a lot of money buying sanding devices, but this homemade one cost me nothing except an hour of my time. I've been using it for five years. The rotating wood in the lathe powers it, and as it spins it sands on two planes, almost like an orbital sander. |
![]() |
---|
Here is another little sander I made to do the inside of bowls. It's simply a ½" threaded rod, bent with a torch, and a business end 3" in diameter with Velcro on it. Put a handle on it, and it is finished. |
|
---|---|
![]() |
![]() |
I make a lot of sanding aids, and all of them use hook and loop paper. |
![]() |
---|
Are you proud of your work? If so - put your name on it, I say. The next thing I'll say is that not all of my pieces have my name on them, so I'm not proud of everything I do. Those that qualify bear this stamp. I love the smoky smell it makes in the shop when I use it. |
![]() |
---|